本文不会像其他笔记那样详细讲解每一个步骤和问题,最近太忙,没有太多时间,突击学习一下,记录下遇到的一些问题,但依然会像其他笔记一样授之以渔。仅针对C++,OpenCV2,假如你没学习过官方提供详细支持的编程语言,例如C/C++/python,建议还是先学一门编程语言再来学习OpenCV吧。看到网上有教程竟然讲OpenCV时还讲起了C语言。http://opencv.org/documentation.html ,即能下载PDF,又能在线查看,还有详细的tutorial,以下多数问题的解决来源于查看官方的Reference Manual:http://docs.opencv.org/2.4/opencv2refman.pdf
关于环境配置 环境配置参见这里Windows下OpenCV与VS开发环境配置
一些入门常用函数 2.图像操作及用户界面的几个函数原型及作用(highgui.hpp):imread:
1 Mat imread (const string& filename, int flags=1 )
用于从文件filename读取图像并在内存中存储为Mat类型,flags用于指宝载入图像使用的色彩类型,如rgb、灰度等
imshow:
1 void imshow (const string& winname, InputArray mat)
在指定的窗口中显示图像mat,由winname指定窗口名称(即窗口标题),如果没有使用namedWindow创建窗口,则新建一个。InputArray类型是一个接口类,可以是Mat、Mat_、Mat_<T, m, n>、vector、vector<vector>、vector类型
imwrite:
1 bool imwrite (const string& filename, InputArray img, const vector<int >& params=vector<int >() )
将图像img保存于指定的文件filname中,最后一个参数于用指定保存的图片格式,如jPEG、PNG等,当不指定最后一个参数时,函数会自动根据finlname中的文件后缀来确定存储格式
createTrackbar:
1 int createTrackbar (const string& trackbarname, const string& winname, int * value, int count, TrackbarCallback onChange=0 , void * userdata=0 )
创建一个名为trackbarname的滑动条,并将其依附到指定的名为winname的窗口上。第三个参数value用于指定滑动指针的位置,需要是个整型指针变量(因为这个变量会在调节滑动条是发生变化,所以需要是个指针变量);第四个参数count就用来指定滑动条最大可以滑动到多少,例如int value = 50,count = 100,则表示程序运行时滑动指针指向50的位置,最大可以滑动的位置是100。第五个可选参数onChange是一个形如void Foo(int,void*);的回调函数,即当滑动条的value变化时就调用该函数,该回调函数中的第一个参数是滑动条的当前值,即value,第二个参数与createTrackbar的最后一个参数userdata一样,可用于在不使用全局变量的情况下向回调函数传递数据来处理滑动条事件,暂时没有使用过。官方提供的一个使用示例在:opencv_source_code/samples/cpp/connected_components.cpp
getTrackbarPos:
1 int getTrackbarPos (const string& trackbarname, const string& winname)
返回滑动条的当前位置,其实也就是上面那个函数的value的当前值。
moveWindow
1 void moveWindow (const string& winname, int x, int y)
移动名为winname的窗口
destroyWindow:
1 void destroyWindow (const string& winname)
销毁给定名称的窗体,释放内存
destroyAllWindows:
1 void destroyAllWindows ()
销毁所有打开着的HighGUI窗体,并释放内存
waitKey:
1 int waitKey (int delay=0 )
等待按键按下,当延时delay毫秒后依然没有按下,停止等待。如果delay为0或负数时表示一直等待,直到键被按下并返回键值,如果delay时间结束时依然没有键被按下返回-1,该函数可用于函数窗口被关闭,类似C中的getchar()
如何使imshow的显示窗口能够调整大小?
1 2 3 4 5 6 7 8 9 10 11 12 13 14 15 16 17 18 19 20 21 22 23 24 25 26 27 28 29 30 31 32 33 34 35 #include <opencv2/core/core.hpp> #include <opencv2/highgui/highgui.hpp> #include <iostream> using namespace cv;Mat img; static void resizeWin (int size, void *) resizeWindow ("rCat" , size, size); imshow ("rCat" , img); std::cout << getTrackbarPos ("TrackBar" , "rCat" ) << std::endl; } int main (void ) int winSize = 80 ; img = imread ("F:\\cat.jpg" , 2 | 4 ); if (img.empty ()) { std::cout << "Could not open or find the image" << std::endl; return -1 ; } namedWindow ("Cat" , WINDOW_NORMAL); imshow ("Cat" , img); namedWindow ("rCat" , WINDOW_NORMAL); createTrackbar ("TrackBar" , "rCat" , &winSize, 1024 , resizeWin); resizeWin (winSize, 0 ); imwrite ("hcat-copy.png" , img); waitKey (0 ); return 0 ; }
播放一个视频
1 2 3 4 5 6 7 8 9 10 11 12 13 14 15 16 17 18 19 20 21 22 23 24 25 26 27 28 29 30 #include <opencv2/opencv.hpp> #include <iostream> int main (void ) cv::VideoCapture vcap ("F:\\bunny.avi" ) ; if (!vcap.isOpened ()) { std::cout << "Video or camera open failed!" << std::endl; return -1 ; } cv::VideoWriter outputVideo; int ex = static_cast <int >(vcap.get (CV_CAP_PROP_FOURCC)); cv::Size S = cv::Size ((int )vcap.get (CV_CAP_PROP_FRAME_WIDTH), (int )vcap.get (CV_CAP_PROP_FRAME_HEIGHT)); outputVideo.open ("F:\\bunny_edge.avi" , ex, vcap.get (CV_CAP_PROP_FPS), S, false ); cv::Mat edges; cv::namedWindow ("Edges" , 1 ); for (;;) { cv::Mat frame; vcap >> frame; cv::cvtColor (frame, edges, CV_BGR2GRAY); cv::GaussianBlur (edges, edges, cv::Size (7 , 7 ), 1.5 , 1.5 ); cv::Canny (edges, edges, 0 , 30 , 3 ); cv::imshow ("Edges" , edges); outputVideo << edges; if (cv::waitKey (30 ) >= 0 ) break ; } return 0 ; }
D:\opencv\sources\samples目录下有很多好玩的实例
核心模块 库的使用,基本的像素操作方法
常用的数据类型和函数 OpenCV中的所有数据类型可以在这里查看:http://docs.opencv.org/2.4.13/modules/core/doc/core.html >>操作,也可以通过cout对它<<操作。直接构造
1 2 3 4 5 6 7 8 9 10 11 12 13 14 15 16 #include <opencv2/opencv.hpp> #include <iostream> using namespace cv;int main (void ) Mat img (300 , 400 , CV_8UC3, Scalar(122 , 33 , 104 )) ; imshow ("Picture" , img); Mat img1 (3 , 4 , CV_8UC3, Scalar(122 , 33 , 104 )) ; std::cout << img1 << std::endl; waitKey (0 ); destroyWindow ("Picture" ); return 0 ; }
Mat img1(3, 4, CV_8UC3, Scalar(122, 33, 104));
1
2
3
[122, 33, 104, 122, 33, 104, 122, 33, 104, 122, 33, 104; 122, 33, 104, 122, 33, 104, 122, 33, 104, 122, 33, 104; 122, 33, 104, 122, 33, 104, 122, 33, 104, 122, 33, 104]
虽然Mat也可以构造为多维的矩阵,但由于imshow和<<运算符只能用于2维或2维以下的Mat对象,所以这里不做解释,可以自行查看这里http://docs.opencv.org/3.0-last-rst/doc/tutorials/core/mat_the_basic_image_container/mat_the_basic_image_container.html#matthebasicimagecontainer
2.通过randu可以使用随机颜色填充Mat对象:
1
2
3
Mat img = Mat (300 , 400 , CV_8UC3); randu (img, Scalar::all (0 ), Scalar::all (255 )); imshow ("Picture" , img);
通过create函数构造
1
2
3
4
Mat M (7 , 7 , CV_32FC2, Scalar(1 , 3 )) ; M.create (100 , 50 , CV8UC (15 )); Mat N; N.create (M.size (), M.type ());
创建一个多维矩阵
1 2 3 int sz[] = {100 , 100 , 100 }; Mat cube (3 , sz, CV_8U, Scalar::all(0 )) ;
通过copy函数从一个Mat对象的指定行或列构造另一个对象
1 2 3 4 5 6 7 8 9 10 11 12 13 14 15 M.row (3 ) = M.row (3 ) + M.row (5 )*3 ; Mat M1 = M.col (1 ); M.col (7 ).copyTo (M1); Mat img (Size(320 ,240 ),CV_8UC3) ;Mat roi (img, Rect(10 ,10 ,100 ,100 )) ;roi = Scalar (0 ,255 ,0 );
通过数组创建
1 2 3 4 5 6 7 8 9 10 11 void process_video_frame (const unsigned char * pixels, int width, int height, int step) Mat img (height, width, CV_8UC3, pixels, step) ; GaussianBlur (img, img, Size (7 ,7 ), 1.5 , 1.5 ); } double m[3 ][3 ] = {{a, b, c}, {d, e, f}, {g, h, i}};Mat M = Mat (3 , 3 , CV_64F, m).inv ();
通过一个逗号分隔的初始化列表创建
1 2 3 4 Mat M = (Mat_ <double >(3 ,3 ) << 1 , 0 , 0 , 0 , 1 , 0 , 0 , 0 , 1 );
MATLAB风格的zeros(),ones(), eye()函数来初始化
1 2 M += Mat::eye (M.rows, M.cols, CV_64F);
3.opencv内建了多种Mat对象的输出格式,还内建了其他一些支持<<输出的数据类型,官方下面这个例子很全,可以运行查看效果:
1 2 3 4 5 6 7 8 9 10 11 12 13 14 15 16 17 18 19 20 21 22 23 24 25 26 27 28 29 30 31 32 33 34 35 36 37 38 39 40 41 42 43 44 45 46 47 48 49 50 51 52 53 54 55 56 57 58 59 60 61 62 63 64 65 66 67 68 69 70 71 72 73 74 75 76 77 78 79 80 81 82 83 84 85 #include "opencv2/core/core.hpp" #include <iostream> using namespace cv;static void help () std::cout << "\n--------------------------------------------------------------------------" << std::endl << "This program shows how to create matrices(cv::Mat) in OpenCV and its serial" << " out capabilities" << std::endl << "That is, cv::Mat M(...); M.create and std::cout << M. " << std::endl << "Shows how output can be formated to OpenCV, python, numpy, csv and C styles." << std::endl << "Usage:" << std::endl << "./cvout_sample" << std::endl << "--------------------------------------------------------------------------" << std::endl << std::endl; } int main (int , char **) help (); Mat M (2 , 2 , CV_8UC3, Scalar(0 , 0 , 255 )) ; std::cout << "M = " << std::endl << " " << M << std::endl << std::endl; M.create (4 , 4 , CV_8UC (2 )); std::cout << "M = " << std::endl << " " << M << std::endl << std::endl; int sz[3 ] = { 2 , 2 , 2 }; Mat L (3 , sz, CV_8UC(1 ), Scalar::all(0 )) ; Mat E = Mat::eye (4 , 4 , CV_64F); std::cout << "E = " << std::endl << " " << E << std::endl << std::endl; Mat O = Mat::ones (2 , 2 , CV_32F); std::cout << "O = " << std::endl << " " << O << std::endl << std::endl; Mat Z = Mat::zeros (3 , 3 , CV_8UC1); std::cout << "Z = " << std::endl << " " << Z << std::endl << std::endl; Mat C = (Mat_ <double >(3 , 3 ) << 0 , -1 , 0 , -1 , 5 , -1 , 0 , -1 , 0 ); std::cout << "C = " << std::endl << " " << C << std::endl << std::endl; Mat RowClone = C.row (1 ).clone (); std::cout << "RowClone = " << std::endl << " " << RowClone << std::endl << std::endl; Mat R = Mat (3 , 2 , CV_8UC3); randu (R, Scalar::all (0 ), Scalar::all (255 )); std::cout << "R (default) = " << std::endl << R << std::endl << std::endl; std::cout << "R (python) = " << std::endl << format(R, "python" ) << std::endl << std::endl; std::cout << "R (numpy) = " << std::endl << format(R, "numpy" ) << std::endl << std::endl; std::cout << "R (csv) = " << std::endl << format(R, "csv" ) << std::endl << std::endl; std::cout << "R (c) = " << std::endl << format(R, "c" ) << std::endl << std::endl; Point2f P (5 , 1 ) ; std::cout << "Point (2D) = " << P << std::endl << std::endl; Point3f P3f (2 , 6 , 7 ) ; std::cout << "Point (3D) = " << P3f << std::endl << std::endl; vector<float > v; v.push_back ((float )CV_PI); v.push_back (2 ); v.push_back (3.01f ); std::cout << "Vector of floats via Mat = " << Mat (v) << std::endl << std::endl; vector<Point2f> vPoints (20 ) ; for (size_t i = 0 ; i < vPoints.size (); ++i) vPoints[i] = Point2f ((float )(i * 5 ), (float )(i % 7 )); std::cout << "A vector of 2D Points = " << vPoints << std::endl << std::endl; return 0 ; }
4.Point类用于表示点,Point_<int>、Point2i、Point三个一样都表示以int为基础元素类型的点,而Point_<float>和Point2f表示以float为基础数据类型的二维上的点:
1
2
3
4
Point p (3 , 4 ) ;Point2f pf (3.14 , 4.13 ) ;p.x = 5 ; p.y = 6 ;
5.Scalar类可用于表示颜色,它是一个含有4个元素的vector,当用于表示RGB时最后一个元素可以省略,RGB在Scalar中的顺序实际是BGR,即三个元素分量分别对应蓝、绿、红。与.NET中的颜色表示一样。上面的例子中已经使用过了
6.尺寸类Size,有2个参数分别可用于表示二维矩阵的宽、高尺寸,同样具有Size2d,表示以double为基础数据类型,感觉跟Point很像,源码定义也确实在一起。:
1
2
Size si (3 , 4 ) ;Size2d sd (3.14 , 4.13 ) ;
7.矩形类Rect,Rect类有4个成员变量用于表示一个矩形的起点坐标(x, y)和尺寸(width, height),还包括了一些很有用的成员函数,如rec.size()返回Size、area()返回面积、contains(Point)判断点是否在矩形内、inside(Rect)判断另一个矩形是否在该矩形内、tl()返回左上角点坐标、br()返回右下角点坐标。
rect = rect + point //平移矩形
rect = rect - point
rect = rect + size //缩放矩形
rect = rect - size
rect += point, rect -= point, rect += size, rect -= size (简化版操作符)
rect = rect1 & rect2 求2个矩形的交集
rect = rect1 | rect2 返回包含两个矩形的最小矩形
rect &= rect1, rect |= rect1 //简化版操作符
rect == rect1, rect != rect1 比较两个矩形
8.颜色空间转换函数cvtColor(),前面已经用过它来转RGB到灰度图。它还可以实现HSV、HSI等色彩模式的转换,函数原型为:
1 void cvtColor (InputArray src, OutputArray dst, int code, int dstCn=0 )
第三个参数是颜色空间转换标识符、第四个参数为目标图像的通道数,0表示取源图像的通道数。
图像表示 1.opencv中的Mat图像以二维矩阵的形式存储,为了效率,有时候会将整个图像在内存中以连续的一行存储,可以通过Mat的成员函数isContinuous()为判断是否为连接存储,如果是,则所有数据在内存中将只以一行的形式存储。
mat.rows 获取总行数,即图片以像素为单位的高度
mat.cols 获取总列数,即图片以像素为单位的宽度
mat.channels() 获取图像的通道数
mat.data 获取图像矩阵的第一行且为第一列的指针,如果返回为空,则表示输入的图像有问题,可以用来判断输入图像是否生效
mat.ptr(i) 获取图像第i行的uchar类型的元素指针
mat.clone() 返回对象副本
Mat类实现由两部分数据组成:矩阵头(包含矩阵尺寸、存储方法、存储地址等信息)和一个指向存储所有像素值的矩阵的指针。Mat的拷贝构造函数只是拷贝Mat对象的信息头和矩阵指针,而不复制矩阵本身,因为矩阵本身存储的数量量太大。当需要Mat副本时,应该使得cone函数获得副本。
2.缩减像素数 new = (old / step ) * step,step为颜色值的跨度步长。然后遍历所有像素,全部这样转换一遍就获得了缩减之后的图像,转换后由于色彩较少,会有点水彩画的感觉。
1
2
3
4
int step = 10 ;uchar table[256 ]; for (int i = 0 ; i < 256 ; ++i) table[i] = (i / step) * step;
这样table里面将是一个缩减后的表,1-9的位置都是0,10-19的位置都是1,依次。。。
而opencv中提供了一个名为LUT的函数,可以直接根据表来实现将一个Mat对象转换为缩减后的Mat对象的功能
1 void cv::LUT ( cv::InputArray src, cv::InputArray lut, cv::OutputArray dst)
下面分别使用普通方式和LUT方式实现图像缩减,推荐使用LUT函数,效率更高
1 2 3 4 5 6 7 8 9 10 11 12 13 14 15 16 17 18 19 20 21 22 23 24 25 26 27 28 29 30 31 32 33 34 35 36 37 38 39 40 41 42 43 44 45 46 47 48 49 50 51 52 53 54 55 56 57 58 59 60 61 62 63 64 65 #include <opencv2/opencv.hpp> using namespace cv;void scanImageAndReduce (Mat &src, uchar *tab) int main (void ) Mat img = imread ("F:\\cat.jpg" ); const int divideWidth = 60 ; uchar table[256 ]; for (int i = 0 ; i < 256 ; ++i) { table[i] = (uchar)divideWidth * (i / divideWidth); } Mat img_reduce; Mat lookUpTable (1 , 256 , CV_8U) ; uchar *p = lookUpTable.ptr (); for (int i = 0 ; i < 256 ; ++i) p[i] = table[i]; LUT (img, lookUpTable, img_reduce); imshow ("Original image" , img); imshow ("Reduced image by LUT" , img_reduce); Mat img_reduce2 = img.clone (); scanImageAndReduce (img_reduce2, table); imshow ("Reduced image by manual" , img_reduce2); waitKey (0 ); return 0 ; } void scanImageAndReduce (Mat &src, uchar *tab) int channel = src.channels (); int nRow = src.rows; int nCol = src.cols * channel; if (src.isContinuous ()) { nCol *= nRow; nRow = 1 ; } uchar *p2 = src.data; for (int i = 0 ; i < nCol * nRow; ++i) *p2++ = tab[*p2]; }
3.统计时间的两个函数,当然C++自带的也可以,举例说明:
1
2
3
4
5
6
double t = getTickCount (); double time0 = ((double )getTickCount () - t) / getTickFrequency (); std::cout << time0 * 1000 << " ms" << std::endl;
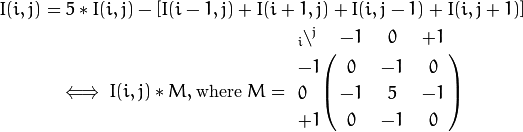
根据每个像素的邻居像素值来修改当前像素实现锐化
官方示例代码如下:
1 2 3 4 5 6 7 8 9 10 11 12 13 14 15 16 17 18 19 20 21 22 23 24 25 26 27 28 29 30 31 32 33 34 35 36 37 38 39 40 41 42 43 44 45 46 47 48 49 50 51 52 53 54 55 56 57 58 59 60 61 62 63 64 65 66 67 68 69 70 71 72 73 74 75 76 77 78 79 #include <opencv2/core/core.hpp> #include <opencv2/highgui/highgui.hpp> #include <opencv2/imgproc/imgproc.hpp> #include <iostream> using namespace std;using namespace cv;void Sharpen (const Mat& myImage, Mat& Result) int main (void ) const char * filename = "F:\\cat.jpg" ; Mat I, J, K; I = imread (filename); if (!I.data) { cout << "Error load image" << endl; return -1 ; } namedWindow ("Input" , WINDOW_AUTOSIZE); namedWindow ("Output by Sharpen" , WINDOW_AUTOSIZE); imshow ("Input" , I); double t = (double )getTickCount (); Sharpen (I, J); t = ((double )getTickCount () - t) / getTickFrequency (); cout << "Hand written function times passed in seconds: " << t << endl; imshow ("Output by Sharpen" , J); Mat kern = (Mat_ <char >(3 , 3 ) << 0 , -1 , 0 , -1 , 5 , -1 , 0 , -1 , 0 ); t = (double )getTickCount (); filter2D (I, K, I.depth (), kern); t = ((double )getTickCount () - t) / getTickFrequency (); cout << "Built-in filter2D time passed in seconds: " << t << endl; namedWindow ("Output by fliter2D" , WINDOW_AUTOSIZE); imshow ("Output by fliter2D" , K); waitKey (0 ); return 0 ; } void Sharpen (const Mat& myImage, Mat& Result) CV_Assert (myImage.depth () == CV_8U); const int nChannels = myImage.channels (); Result.create (myImage.size (), myImage.type ()); for (int j = 1 ; j < myImage.rows - 1 ; ++j) { const uchar* previous = myImage.ptr <uchar>(j - 1 ); const uchar* current = myImage.ptr <uchar>(j); const uchar* next = myImage.ptr <uchar>(j + 1 ); uchar* output = Result.ptr <uchar>(j); for (int i = nChannels; i < nChannels*(myImage.cols - 1 ); ++i) { *output++ = saturate_cast <uchar>(5 * current[i] - current[i - nChannels] - current[i + nChannels] - previous[i] - next[i]); } } Result.row (0 ).setTo (Scalar (0 )); Result.row (Result.rows - 1 ).setTo (Scalar (0 )); Result.col (0 ).setTo (Scalar (0 )); Result.col (Result.cols - 1 ).setTo (Scalar (0 )); }
通过上面的运行结果,明显内建函数速度要快很多
其中int Mat::depth() cont返回对象的位深度,例如16-bit signed的图像返回的就是CV_16S。所有位深度的对应信息如下:
CV_8U - 8-bit unsigned integers ( 0..255 )
CV_8S - 8-bit signed integers ( -128..127 )
CV_16U - 16-bit unsigned integers ( 0..65535 )
CV_16S - 16-bit signed integers ( -32768..32767 )
CV_32S - 32-bit signed integers ( -2147483648..2147483647 )
CV_32F - 32-bit floating-point numbers ( -FLT_MAX..FLT_MAX, INF, NAN )
CV_64F - 64-bit floating-point numbers ( -DBL_MAX..DBL_MAX, INF, NAN )
4.读写感兴趣区域ROI
1 2 Mat::Mat (const Mat& m, const Range& rowRange, const Range& colRange=Range::all () ) Mat::Mat (const Mat& m, const Rect& roi)
举例:
1
2
3
4
5
Mat srcImg; Mat imgROI = srcImg (Rect (100 , 80 , ncols, nrows)); Mat imgROI2 = srcImg (Range (100 , 100 + nrows), Range (80 , 80 + ncols));
使用举例,通过copyTo()函数将一个图像拷贝到另一个图像,copyTo()有一个重载可以附加一个mask来实现隐现效果:
1 2 3 4 5 6 7 8 9 10 11 12 13 14 15 16 17 18 19 20 21 22 23 24 25 26 27 28 29 30 #include <opencv2/core/core.hpp> #include <opencv2/highgui/highgui.hpp> #include <iostream> using namespace cv;int main (void ) const char * srcFileName = "F:\\cat.jpg" ; const char * logoFileName = "F:\\mini.jpg" ; Mat srcImg = imread (srcFileName); Mat logoImg = imread (logoFileName); if (!srcImg.data || !logoImg.data) { std::cout << "File load error \n" ; return -1 ; } Mat roiImg = srcImg (Rect (srcImg.rows / 2 , srcImg.cols / 2 , logoImg.cols, logoImg.rows)); logoImg.copyTo (roiImg, logoImg); imshow ("ROI mask picture" , srcImg); waitKey (0 ); return 0 ; }
5.addWeighted线性混合两张图像 http://docs.opencv.org/3.0-last-rst/doc/tutorials/core/adding_images/adding_images.html
6.调整图像对比度与亮度
1 Mat new_image = Mat::zeros ( image.size (), image.type () );
官方示例:http://docs.opencv.org/3.0-last-rst/doc/tutorials/core/basic_linear_transform/basic_linear_transform.html new_image.at<Vec3b>(y, x)[c],其中y是行,x是列,Vec3b就是一个含有3个uchar的vector:typedef Vec<uchar, 3> Vec3b,c表示R、G或B,取值0、1或2。saturate_cast<type>(value)将value强制转换为有效的type类型的值
7.离散傅里叶变换DFT http://docs.opencv.org/3.0-last-rst/doc/tutorials/core/discrete_fourier_transform/discrete_fourier_transform.html
8.OpenCV内建对xml和yaml的解析 http://docs.opencv.org/3.0-last-rst/doc/tutorials/core/file_input_output_with_xml_yml/file_input_output_with_xml_yml.html http://docs.opencv.org/2.4.13/modules/core/doc/xml_yaml_persistence.html
9.内建多种图形绘制 http://docs.opencv.org/3.0-last-rst/doc/tutorials/core/basic_geometric_drawing/basic_geometric_drawing.html 直线函数line
1 void line (Mat& img, Point pt1, Point pt2, const Scalar& color, int thickness=1 , int lineType=8 , int shift=0 )
thickness就是线宽,lineType就是线的结构,8表示当斜线时两个像素角相连就认为其已经相连了,如果是4则是两个像素有一整条边相连时才算相连。arrowedLine
圆circle
1 void circle (Mat& img, Point center, int radius, const Scalar& color, int thickness=1 , int lineType=8 , int shift=0 )
椭圆函数elipse
1
2
void ellipse (Mat& img, Point center, Size axes, double angle, double startAngle, double endAngle, const Scalar& color, int thickness=1 , int lineType=8 , int shift=0 ) void ellipse (Mat& img, const RotatedRect& box, const Scalar& color, int thickness=1 , int line- Type=8 )
矩形函数rectangle
1
2
void rectangle (Mat& img, Point pt1, Point pt2, const Scalar& color, int thickness=1 , int lineType=8 , int shift=0 ) void rectangle (Mat& img, Rect rec, const Scalar& color, int thickness=1 , int lineType=8 , int shift=0 )
画填充的多边形用fillPoly
举例:
1 2 3 4 5 6 7 8 9 10 11 12 13 14 15 16 17 18 19 20 21 22 23 24 25 26 27 28 29 30 31 32 33 #include <opencv2/core.hpp> #include <opencv2/highgui.hpp> using namespace cv;const int backWidth = 400 ;int main (void ) Mat backImg = Mat::zeros (backWidth, backWidth, CV_8UC3); int thickness = 2 ; int lineType = 8 ; int radius = 100 ; Point start = Point (backWidth / 2 - radius, backWidth / 2 - radius); Point end = Point (backWidth / 2 + radius, backWidth / 2 + radius); rectangle (backImg, start, end, Scalar (255 , 255 , 255 ), thickness, lineType); circle (backImg, Point (backWidth / 2 , backWidth / 2 ), radius, Scalar (255 , 255 , 255 ), thickness); line (backImg, start + Point (0 , radius), end - Point (0 , radius), Scalar (255 , 255 , 255 ), thickness); line (backImg, start + Point (radius, 0 ), end - Point (radius, 0 ), Scalar (255 , 255 , 255 ), thickness); imshow ("Draw" , backImg); waitKey (0 ); return 0 ; }
RNG可以实现产生随机数,putText将窗口中显示文字 http://docs.opencv.org/3.0-last-rst/doc/tutorials/core/random_generator_and_text/random_generator_and_text.html
1
2
3
int RNG::uniform (int a, int b) float RNG::uniform (float a, float b) double RNG::uniform (double a, double b)
putText显示文字
1 void putText (Mat& img, const string& text, Point org, int fontFace, double fontScale, Scalar color, int thickness=1 , int lineType=8 , bool bottomLeftOrigin=false )
getTextSize可以返回字符串的大小:
1 Size getTextSize (const string& text, int fontFace, double fontScale, int thickness, int * baseLine)
举例:
1 2 3 4 5 6 7 8 9 10 11 12 13 14 15 16 17 18 19 20 21 22 23 24 25 26 27 28 29 30 31 32 33 34 35 36 37 38 39 40 41 42 43 44 45 46 47 48 49 50 51 52 #include <opencv2/core.hpp> #include <opencv2/highgui.hpp> using namespace cv;const int backWidth = 400 ;static Scalar randomColor (RNG& rng) int icolor = (unsigned )rng; return Scalar (icolor & 255 , (icolor >> 8 ) & 255 , (icolor >> 16 ) & 255 ); } int main (void ) Mat backImg = Mat::zeros (backWidth, backWidth, CV_8UC3); RNG rng (0xFFFFFFFF ) ; int thickness = 2 ; int lineType = 8 ; int radius = 100 ; Point start = Point (backWidth / 2 - radius, backWidth / 2 - radius); Point end = Point (backWidth / 2 + radius, backWidth / 2 + radius); rectangle (backImg, start, end, randomColor (rng), thickness, lineType); circle (backImg, Point (backWidth / 2 , backWidth / 2 ), radius, randomColor (rng), thickness); line (backImg, start + Point (0 , radius), end - Point (0 , radius), randomColor (rng), thickness); line (backImg, start + Point (radius, 0 ), end - Point (radius, 0 ), randomColor (rng), thickness); Point org; org.x = rng.uniform (10 , backWidth / 2 ); org.y = rng.uniform (backWidth / 2 , backWidth - 10 ); putText (backImg, "Maxwi.com" , org, rng.uniform (0 , 8 ), rng.uniform (0 , 100 ) * 0.05 + 0.1 , randomColor (rng), rng.uniform (1 , 10 ), lineType); imshow ("Draw" , backImg); waitKey (0 ); return 0 ; }
imgproc组件 手动图像处理功能。包括图像的基本处理、变换、轮廓提取、图像分割与修复、直方图与匹配http://docs.opencv.org/3.0-last-rst/doc/tutorials/imgproc/table_of_content_imgproc/table_of_content_imgproc.html 平滑处理(smoothing)
方框滤波:boxFilter()
均值滤波(领域平均滤波):blur(),其实是基本的方框滤波
高斯滤波:GaussianBlur()
中值滤波:medianBlur()
双边滤波:bilateraFilter()
举例:
1 2 3 4 5 6 7 8 9 10 11 12 13 14 15 16 17 18 19 20 21 22 23 24 25 26 27 28 29 30 31 32 33 34 35 36 37 38 39 40 41 42 43 44 45 46 47 48 49 50 51 52 53 54 55 56 57 58 59 60 61 62 63 64 65 66 67 68 69 70 71 72 73 #include "opencv2/imgproc/imgproc.hpp" #include "opencv2/highgui/highgui.hpp" #include "opencv2/features2d/features2d.hpp" using namespace std;using namespace cv;int DELAY_BLUR = 500 ;int MAX_KERNEL_LENGTH = 31 ;Mat src; int display_dst (const char * winname, const Mat& img, int delay, int i) int main (void ) Mat dst_blur, dst_ga, dst_me, dst_bi; src = imread ("F:\\lena.jpg" , 1 ); imshow ("Original" , src); dst_blur = src.clone (); dst_ga = src.clone (); dst_me = src.clone (); dst_bi = src.clone (); for (int i = 1 ; i < MAX_KERNEL_LENGTH; i = i + 2 ) { blur (src, dst_blur, Size (i, i), Point (-1 , -1 )); if (display_dst ("blur" , dst_blur, DELAY_BLUR, i) != 0 ) { return 0 ; } } for (int i = 1 ; i < MAX_KERNEL_LENGTH; i = i + 2 ) { GaussianBlur (src, dst_ga, Size (i, i), 0 , 0 ); if (display_dst ("GaussianBlur" , dst_ga, DELAY_BLUR, i) != 0 ) { return 0 ; } } for (int i = 1 ; i < MAX_KERNEL_LENGTH; i = i + 2 ) { medianBlur (src, dst_me, i); if (display_dst ("medianBlur" , dst_me, DELAY_BLUR, i) != 0 ) { return 0 ; } } for (int i = 1 ; i < MAX_KERNEL_LENGTH; i = i + 2 ) { bilateralFilter (src, dst_bi, i, i * 2 , i / 2 ); if (display_dst ("bilateralFilter" , dst_bi, DELAY_BLUR, i) != 0 ) { return 0 ; } } waitKey (0 ); return 0 ; } int display_dst (const char * winname, const Mat& img, int delay, int i) imshow (winname, img); if (i < MAX_KERNEL_LENGTH) waitKey (delay); else waitKey (0 ); return 0 ; }
highgui组件 读写图像及视频文件、如何使用内建的用户界面库http://docs.opencv.org/3.0-last-rst/doc/tutorials/highgui/table_of_content_highgui/table_of_content_highgui.html
calib3d组件 相机校正及三维信息重建http://docs.opencv.org/3.0-last-rst/doc/tutorials/calib3d/table_of_content_calib3d/table_of_content_calib3d.html
feature2d组件 主要用于触点检测,边缘检测等http://docs.opencv.org/3.0-last-rst/doc/tutorials/features2d/table_of_content_features2d/table_of_content_features2d.html
video组件 主要用于对视频流的处理算法,可以进行运动提取、目标跟踪等http://docs.opencv.org/3.0-last-rst/doc/tutorials/video/table_of_content_video/table_of_content_video.html
objdetect组件 进行目标检测http://docs.opencv.org/3.0-last-rst/doc/tutorials/objdetect/table_of_content_objdetect/table_of_content_objdetect.html
ml组件:Machine Learning opencv在机器学习中的使用http://docs.opencv.org/3.0-last-rst/doc/tutorials/ml/table_of_content_ml/table_of_content_ml.html
photo组件 使用opencv进行高级图像处理http://docs.opencv.org/3.0-last-rst/doc/tutorials/photo/table_of_content_photo/table_of_content_photo.html
gpu模块 使用GPU加速计算机视觉http://docs.opencv.org/3.0-last-rst/doc/tutorials/gpu/table_of_content_gpu/table_of_content_gpu.html
opencv在iOS中的应用 http://docs.opencv.org/3.0-last-rst/doc/tutorials/ios/table_of_content_ios/table_of_content_ios.html
OpenCV Viz模块 3D虚拟空间模块http://docs.opencv.org/3.0-last-rst/doc/tutorials/viz/table_of_content_viz/table_of_content_viz.html